How to Self Publish a Book

A really good way to help promote yourself as a subject matter expert is to author and publish a book. While it is still pretty difficult to have your manuscript picked up by a major publishing house, self-publishing a book has never been easier.
A self-published book is a great way to impress prospects or clients and can even be a source of revenue by using reseller programs like Amazon Advantage.
Whatever your motive, self-publishing is really easy. There are probably dozens of different ways to get the job done but the follow is a framework I’ve used in the past and know to be successful.
Start with the Manuscript
This is main content section of your book and this is where you should spend the most amount of time and energy. Preparing the manuscript is fairly straightforward. Just open up a Word document and start writing. Don’t worry too much about formatting at this point as that will be addresses later.
For our first book we had a manuscript that was about 45 pages long in the default Word layout. When reformatted to the actual book size we ended up with about 50 pages. Adding another 10 or so for titles and appendices we ended up with about a 60 page book. That’s a little light in my opinion especially if your asking upwards of $20 for the book. A decent sized book will be about 100 to 150 pages. However, don’t fill your book with crap just to get the page count up. If you run out of quality content at 45 pages (like us) just stop.
Outsource the Cover Art
Unless you’re a graphic artist you’ll have to get some help with this. If you personally know someone that has the skills that’s great, but if you don’t know an artist you don’t have to worry.
For the cover art on our first book I outsourced the job on Elance.com. The process was very simple. I created a job which told the prospects what I wanted and how much I was willing to pay. Within minutes artists from around the world were competing for the job.
For our job I selected an artist from Pennsylvania. She had good references and showed me some quality work she’d done in the past. I think we paid about $200 and for that we got a high resolution (300 dpi) graphic we could use for the cover art, two different ad banners (250×300 and 120×240) and another “ebook” image of the cover.
If you can, try to negotiate the source files as part of the deal. For our job, I got the source files of the cover art. With the source file of the front I was able to make some minor modifications and create my own back cover. Further, when I was preparing the second edition of the book, I just went back to the source files, changed the color, added the text “Second Edition” and viola, i had a brand new cover. I have Photoshop so this tactic works for me.
Format Your Manuscript
I picked up this tip when talking to a book printer. If you submit your native Word document for printing, the book printer will have to reformat the document to fit the actual book size (Word docs are 8.5″x11″ and printed books are around 5.5″x8.5″). If the printer does this for you, they’ll charge you. About $100 if I remember right.
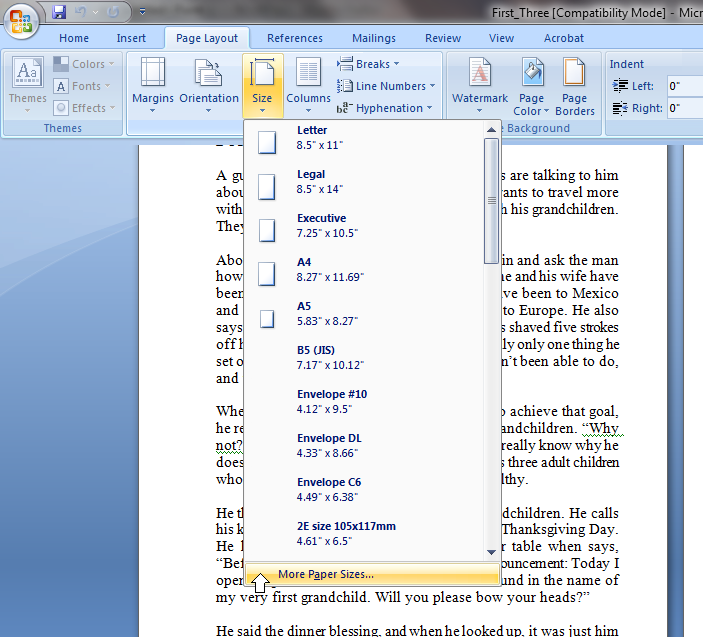
If you want to avoid the $100 fee and also gain more control on the final product, you can format the book yourself. For Word 2007 users, this is very easy. Click on the tab for Page Layout select the tab for Size then select the last option for More Paper Sizes… (see picture). This brings up the Page Setup window and the Paper tab should be selected. Select the drop down arrow under Paper Size and select the last option for Custom Size. Change the Width to 5.5″ and the Height to 8.5″. Select OK, then watch as your manuscript gets resized to proper book printing size.
For an even more polished look, add some headers and footers. To make the most of your space, you’ll want to change the margins their maximum. To do this in Word 2007, again select the tab for Page Layout but this time select the sub-tab for Margins. Select the last option for Custom Margins. This again brings up the Page Setup window but this time the Margins tab should be selected. Under Pages, click the drop down arrow and select the option for Mirror margins. Change the Top, Bottom and Outside margins to 0.5″ and change the Inside margin to 0.8″. Select OK. The reason the inside margin is a little wider is because of the book binding. You’ll need to allow for more white space so your text does not bleed into the bind.
After you are properly formatted you should be ready for printing. However, this is a good time to review the final manuscript for fonts, line spacing, paragraph and line breaks and everything else.
Purchase an ISBN
If you plan on selling your book at any retail outlet or using Amazon Advantage, you’ll need an ISBN. Fortunately this is very easy too. Again there are probably dozens of outfits that will sell ISBNs but in the past I’ve used Publisher Services (a division of Barcode-US) with good results. For $55 you get an ISBN assignment and a digital copy of the barcode that you can place on the back cover of your book. The digital copy from Publisher Services comes as an EPS file which can easily integrate into your PSD file if you requested the source file from your graphic artist.
If you don’t have Photoshop or if you can’t integrate the barcode onto the back cover yourself, you’ll probably have to have the book printer do that for you. Expect a small fee for this service.
Select a Printer
You’ll have lots of choices here too. Again I went with Barcode-US, the people who sold me the ISBN. The process basically goes like this: send them your manuscript and cover art (front and back) and tell them how many copies you want. You’ll have to pay an upfront deposit (I paid $200. $40 of which covered overnight delivery of a “hard proof” and the rest went toward the final purchase).
The people at Barcode-US will put together your covers and manuscript in a PDF “soft proof” and sent it back to you. A soft proof is just a digital copy of what the final product will look like. Look it over carefully. Make any changes you see that are necessary and resubmit to printer. Once you OK the soft proof, they’ll print one copy (the hard proof) and overnight it to you. At this point if you need to make a change you’ll have to pay a $75 fee plus another $40 overnight delivery charge for second hard proof…so make sure the soft proof is good before you order the hard proof.
If you OK the hard proof then your order will go into printing. A few days later a pile of books will show up at your door.
Why Not Publish Your Book?
Now you have the guide to publishing a book. I can tell you from personal experience it works and it really is very easy.
How about you? Have you self-published a book? What’s your story?
No comments yet.